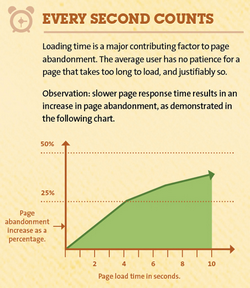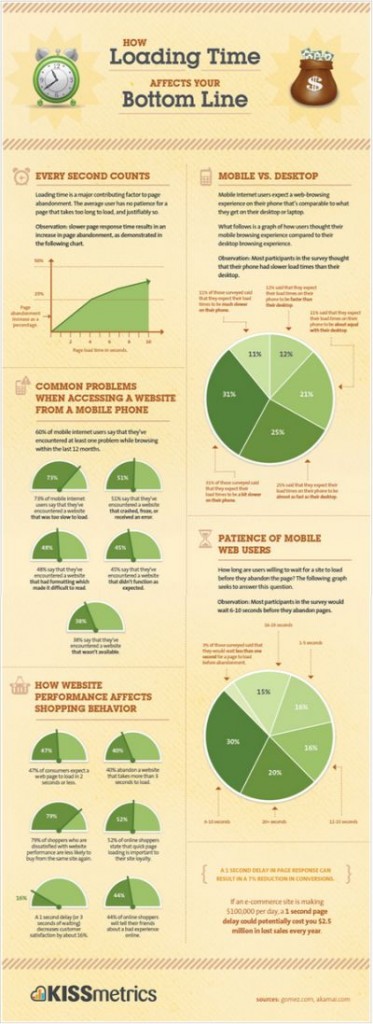
Website speed, often the last thing on your mind when you are planning a new website, but the first thing you react to when surfing the web and landing on a website that takes longer to load in your browser. It’s important that your site speed is reasonable – around 5 seconds or less is good or you are probably losing money.
With 57% of online consumers only waiting 3 seconds for a web page to load before abandoning it your website and business could be at risk of suffering (or already suffering) negative impacts from bad load time.
Speed is something that impacts every online service in a vast number of ways. Even Google is not exempt from speed issues, one of their tests has shown that for every 500ms of loading time, Google experiences a 20% drop in traffic.
One thing I would pay attention to, is optimising for speed. It is a slight factor in Google’s rankings, and a lot of people have run tests, and they have discovered that if you are able to increase the speed, customers end up doing more things: more purchasing, more exploring, more browsing. You can definitely increase your ROI if you decrease your latency……… (It) can have a very big impact on your bottom line.
Matt Cutts – Google
For those of you who don’t know what I am talking about; website speed or load time refers to the time that a web page takes to load from the moment you click a link to the new page to the time the page is fully loaded, including any blank screen time in the middle.
For the typical small to medium sized business, having a slow website could impact more than the time users have to spend to find all relevant content on your site. Having slow loading speeds often leads to a higher bounce rate, less time on the site, higher exit numbers and as such less conversions.
While it is important that you know why good speed is essential for your website it is more important that you know what you need to do to test and improve your website speed. Below we have provided a 5 step guide on how you can improve your website speed for the better.
Step 1: Find your starting point

Before you can start optimising your speed you need to determine your current load time to find out what you are improving on and just how bad your current speed is.
There are a number of different services you can use to test your current performance, the ones we have mentioned below show a number of statistics that can be very useful for your performance improvement:
- Browser Mob: Broswer Mob test your page from a number of locations and then average them out to find the most standard speed providing you with accurate global results.
- Gt Metrix: GT Metrix provides you more of a to do list result than what you receive with Browser Mob. Again it only tests page by page however this provides excellent information for your master pages. It will also provide you with a list of items to take to your website developer for improvement (along with the items below).
You should aim for 5 secs or less. If you page is 5-10 secs and above then you need to read on.
Step 2: Optimise your images
Unfortunately images are often the cause of healthy websites slowing down. Too many images, images that have been uploaded too large and shrunk by HTML, images with excess white space, images used in place of text or images that are not optimised for the web are all speed munchers.
You need to re-size your overly large images and remove any that are no longer used or relevant.
Before loading any new images use a tool such as Irfanview to re-size your images to the size you want to display rather than the 3000+ px that is downloaded from your camera. Images that are set to display in a lightbox (pop up) should be around 600 x 400px max, any more and you are over doing it (unless you run a professional photography business). Standard images to display as part of your text should be between 100 – 300px wide and saved for the web to get a smaller file size.
When saving images for the web you should aim to save them as a JPEG, PNG or GIF as often as possible as these are smaller file types. Adjusting the file size of these images will also impact your speed, as a guide your file size should be between 50 -60KB at a maximum, aiming for smaller is always best however you shouldn’t decrease your resolution below 72PPI (pixels per inch).

Step 3: Remove excess functionality
If your website is built on a CMS, chances are there are a couple modules or plugins that have been added over time that are no longer the use. One of the easiest ways to slim down your website is to remove these excess files.
Step 4: Offer a mobile site
Loading speed doesn’t just effect desktop users, mobile users are now expecting your site to load just as fast on their mobile device. To ensure you aren’t bombarding them with excess load times and overly large imagery and videos ask your web developer to set you up with a mobile friendly version of your website. If you are lucky enough to be running wordpress.If you are using the WordPress CMS you can use plugins such as WP Touch to achieve this quite easily.
Step 5: Re-test
Once you have made the simple changes above go back to the services listed in step 1 and re-test your pages. Once you have re-run your testing you can then send any of the remaining items from your GT Metrix results through to your web developer. Your web developer should then be able to provide you with a plan and further information on how they can help to improve your speed times.
For a large view of the infographic please go to: http://blog.kissmetrics.com/loading-time/

Infographic Credits to: KissMetrics
Image Credits: David Acosta Allely / Shutterstock.com


